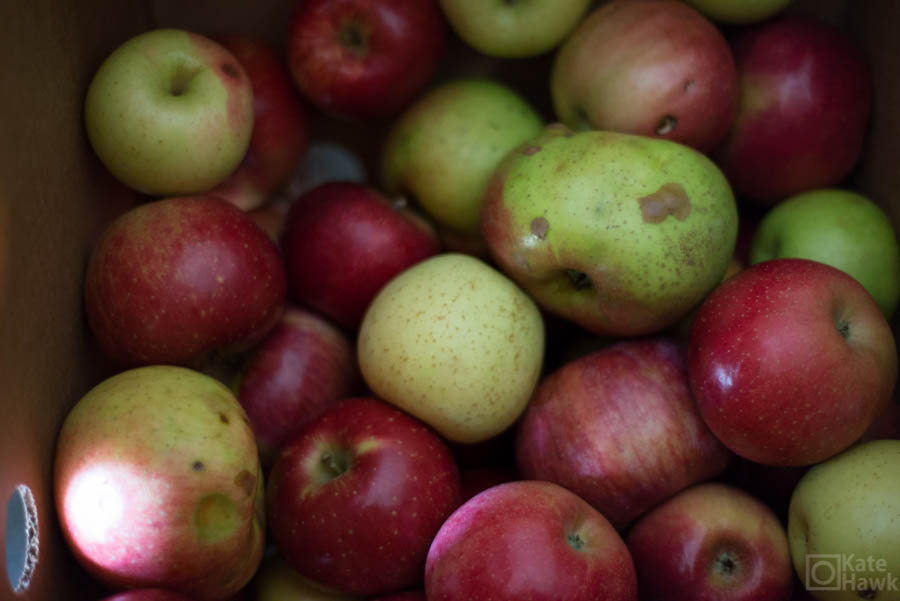
Last year we got yellow delicious apples and made our apple sauce from just that varietal. Once we finished all our apple sauce last year, I met a gentleman at Findlay Market who started grafting apples as a hobby. He had about eight varieties of apples, and after some discussion with him, I thought our apple sauce could have a little more depth if we used several different types of apples.
I found this gentleman at Findlay this year, and arranged to get a mixed bushel of apples from him. I should have written down all the varietals that we had in that bushel, but I failed. I know yellow delicious was one of the varietals we had. I hadn’t heard of most of the others. I think cort and mollies were a couple of the others.
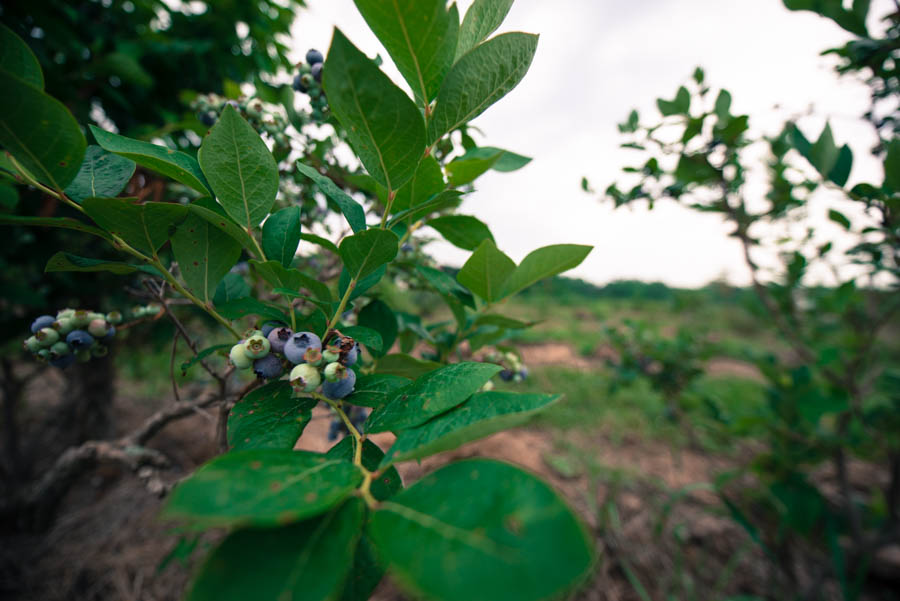
Apples. I think there was at least eight varieties in this box.
Apples, before they were cored.
This is what a bushel of apples looks like.
I do know that when we tasted the apples, I was shocked by how different they were. They varied from texture to flavor. Some were tart. Some were crisp. Some were sweet.
Making the sauce didn’t bring many surprises. We did learn the hard way that packing the pot too full resulted in burning some of the apples at the bottom of the pot. The smoky flavor that this imparted to the sauce was too intense to salvage as a sweet apple sauce. We canned the unsweeted smoky apple sauce, thinking that this would be delicious in savory dishes. I should think that sauce would make a terrific garnish for seared pork chops or roasted pork loin. It would also work in a savory crepe with a robust cheese like gorgonzola.
We didn’t make the same mistake with the remaining batches. I have noticed that when we can with vanilla, the flavor really deeps with age. So when we compared the new sauce to the batch that we canned last year, the vanilla flavor wasn’t as prominent. I expect that this will change as the sauce ages in the jars. The sauce tastes great as it is, but I would like to revisit the results in a few months when the vanilla matures.
Cooking the apples down for sauce. We used a food mill to take out all the skins. Keeping the skins on made the sauce thicken due to the pectin in the skin.
We fueled ourselves with a couple of hand pies from O Pie O. They were delicious. If you don’t want to master making pie crust, just grab a pie from these guys. That’s the best bought pie I have ever had.
Look at how cute it is! That was the strawberry raspberry balsamic pie.
This is the apple hand pie in cross section.
We also snagged a half bushel of tomatoes and made tomato paste. I don’t know what I was expecting. The tomatoes cooked down into 8 little jam jars; I think those jars only hold about a half a cup. Words won’t do justice to how flavor-packed this homemade paste was. We only seasoned the paste with salt and bay leaves. The resulting paste was rich and velvety. It captured all the bright acidity of the tomatoes along with the caramelized sweetness that all that cooking and evaporation causes.
I haven’t used the paste in cooking yet, but it tastes too good to dilute in a marinara sauce. I haven’t decided what I will do with these little jars of gold. I’m sure I will blog about whatever I end up doing with them.
If you are considering trying this at home, be prepared for it to take all day. Between the stovetop cooking, the oven roasting, and the canning, this was a very time-consuming project. but now that I understand how much better this homemade paste is to commercially canned paste, I will be happy to devote the time required. It’s shocking how rich that paste is. Those little jars were well worth the hours and hours of effort.
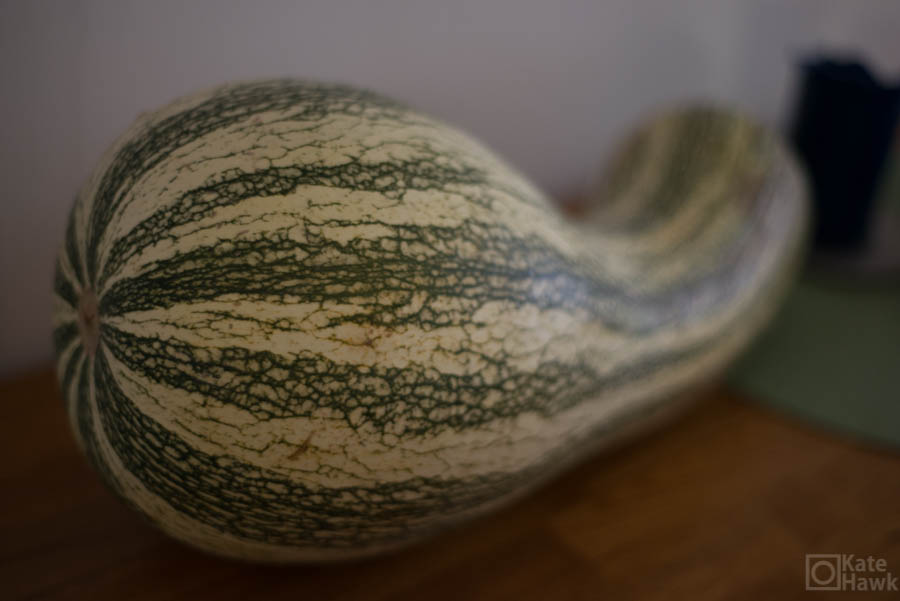
I bought a couple of cushaws a week ago. I had one last year, and attempted it as a substitute for pumpkin. That yielded mixed results. I liked the flavor of the squash enough to give it another try this year. This year I looked up recipes that called specifically for cushaw. I just realized that I was struggling with whether cushaw should be singular or plural. The cushaws I got were enormous, so all my recipes only called for part of a cushaw, so I will stick with the singular as is often used for another large gourd, butternut squash.
Cushaw. This monster is about a foot and a half tall and about a foot across at it’s base.
Enormous cushaw!
I wasn’t sure how all these foods would mix together, but they turned out a delicious fall veggie-friendly, Southern-inspired meal that went perfect with blogging and watching football. I whipped up the following:
For the most part I followed the recipes listed above. Here’s where I went rogue. I used dried pinto beans as opposed to canned kidney beans. I cooked the pinto beans in my last jar of homemade veggie broth. When they finished cooking, I held the broth aside and then used that instead of the water that the recipe calls for. I also only had about 3 cups of cooked beans, which was slightly less than the 3 and 1/2 cups that would have come from to cans of beans. I cut the cinnamon and clove by half. I cut this back because I wanted the flavor to be subtle. Plus, I knew I could always add more if desired. Cutting back the cinnamon and clove turned out to be an excellent idea. I used some of the heirloom tomatoes that I canned this summer in the recipe as opposed to store-bought canned tomatoes. My tomatoes were packed with garlic cloves, so that probably amped up the garlic flavor of my beans.
The pinto beans in the pot. I think this is the best way I have ever had pinto beans prepared.
For the beet greens, I didn’t use bacon. I used canola oil to caramelize the onions, and then added a bit of Bragg’s Amino Acids. The bacon should add umami and salt, and Bragg’s is a pretty good veggie substitute for both of these flavors. I also didn’t have a full lb of beet greens, so I cut back the rest of the ingredients to compensate.
The beet greens.
The roasted spiced cushaw wasn’t complicated. I just cubed the cushaw and tossed it with butter brown sugar and Saigon cinnamon. I measured nothing. I will say this, cushaw has a very delicate flavor, so cinnamon can overwhelm it quickly. I really just put a couple of dashes of it on the whole pan of cushaw. I roasted the cushaw at 400 degrees until it was easily mashed with a fork. Otherwise I followed the other recipes.
I was pleasantly surprised with my feast. All of the flavors of the meal worked really well together. The greens were salty and acidic. The beans were rich and savory. The roast cushaw was sweet and creamy. Everything tasted wonderful on it’s own, and each dish complimented the other. I think the sum of the meal was greater than any of the parts on their own.
My feast of beet greens, cornbread, roasted cushaw, and pinto beans.
The cushaw pie was delicious. I really enjoyed that the recipe didn’t have cinnamon. The nutmeg and allspice made the pie taste more decadent than a standard pumpkin pie. It’s also different enough from pumpkin pie, that it would make a nice alternative for a Christmas pie once everyone has had their fill of pumpkin at Thanksgiving.
The cushaw pie right out of the oven.
The cushaw pie set-up pretty well. But I let the pie cool completely before cutting it. I think that’s crucial to avoiding a sloppy mess.
We are getting good at this canning stuff. Since nature doesn’t acquiesce to my timelines, I got a bushel and a half of peaches and a bushel of tomatoes in the same weekend. That’s a lot of food to can. It was my preference to do the peaches one weekend and the tomatoes the following. However, the old curmudgeons told me upon picking up my peaches that canning tomatoes could arrive the following day.
Their canning tomatoes are only 10 bucks a half bushel, so I couldn’t really say no without kicking myself in the wallet. There’s no better price out there for fresh tomatoes. I’m a sucker for a good deal.
We had to act quickly. The peaches were ripe, and would devolve into moldy mess in a matter of a few days. The tomatoes, being canning tomatoes, had blemishes on them. Those blemishes can turn into a moldy mess too. We chose to can the peaches first, as just the weight of them in the half bushel baskets could cause bruises and hasten molding.
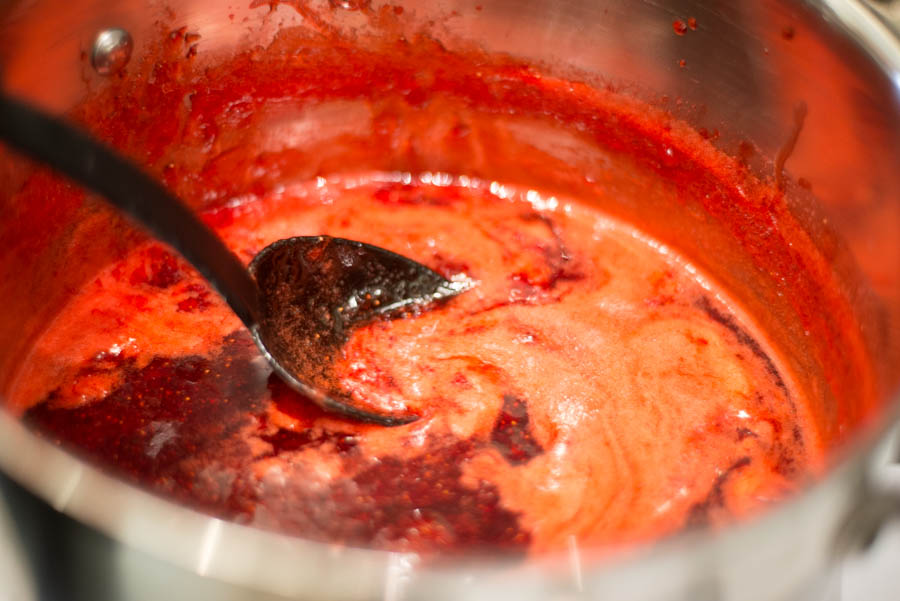
We canned several varities: bourbon peaches, vanilla peaches, tea infused peaches, spiced peaches, and bourbon spiced peaches. We learned from our mistakes last year. We put the spices directly in the jars last year. This had two effects. First, the flavors were inconsistent. One jar tasted like star anise while the next tasted like cardamom. Plus, the woody spices (the star anise and cinnamon) got an increasingly bitter taste to them the longer the peaches aged in the jar. Notable exception, vanilla only continued to taste better and better as it aged in the jars.
To correct for this problem, we infused the simple syrup with the woody spices, and placed the vanilla in the jars. Time will tell how well this new process will work out. Without question this should solve for the inconsistency in flavor. It’s hard telling how the peaches spiced in this way will age. I will tell you in 2015.
It took a nine hour marathon canning session to work through only two thirds of the peaches. We wearily gave up, partially because we ran out of jars and partially because we were dead on our feet. I got a very early start on Sunday. I was hoping to make our second day canning shorter than the prior. But given that we weren’t halfway through our produce, I wasn’t feeling terribly optimistic.
I started the day finishing the remaining half bushel of peaches. After digging through my jars, I was able to scrounge up enough of them to leave only enough peaches for a pie. By the time Ali arrived with more jars, I was processing the last of the peaches, praise be the gods of sticky simple syrup and having a closet full of mason jars.
Ali arrived around ten, and we started on the tomatoes. Our typical pattern is for Ali to blanch the produce and handle jar packing and processing while I skin and prep the fruit for the jars. Our roles got reversed somehow. There was a plausible reason for this at the time, but I don’t recall it. We packed all the tomatoes in boiling water with about a teaspoon of kosher salt, a tablespoon of lemon juice, and a sprig each of fresh rosemary, thyme, and oregano. We followed a similar process last year, and the resulting tomatoes were lovely in marinara or a tomato soup.
I don’t know how it happened. All I know is we were done processing those tomatoes by 2pm. There were four things that were a bit different about the tomatoes. The tomatoes didn’t require packing in simple syrups. We just had to have steady supply of boiling water, nor did they need to be sliced as the peaches did. All of the tomatoes were put in quart jars, while some of the peaches went it smaller jars. Finally, I was the packer/processor, while Ali was the produce peeler. I don’t know how anyone of those things contributed to us finishing so quickly, but I was grateful for it.
We learned some things. First, we noticed that a half bushel of produce will fill a case of quart jars. So, you can do some math around that and calculate how many smaller sized jars you might need. We also learned that my pot’s maximum jar capacity is 6 quart jars at a time. Finally, we learned that canning two and half bushels of produce in one weekend is too much. Finally, peach pie made with fresh fruit is amazing!!
Next up on the canning schedule? We might make some tomato paste this weekend. Plus, we will be canning pumpkin, apples, and perhaps cushaw this fall.
Half bushel of peaches.
Bushel of tomatoes.
So many peaches. These are the peaches that were packed in tea.
Given that we attempted a little too much when we picked and canned blueberries, we restricted the scope a bit when we picked and canned black raspberries. A number of details made our raspberry day a little better than our blueberry day. You know, stuff like not attempting to make more than one pastry.
We set out to make a sugar-free jam, a regular jam, 4 quarts of pie filling, and one pie. Aside from making only one baked good, We’ve made all of the recipes aside from the sugar-free jam before. Plus, with our first clear jel adventure behind us, we were prepared for it’s oddities.
I picked Ali up at 7. We arrived at the farm around 8:20. Picking and sourcing local produce it a bit of an adventure. The process is something like this. You drive out to a isolated location. Then you approach an unfamiliar and often poorly marked building that most likely looks like a stereotypical old farm house. Then you knock and hope that Google maps has directed you to the correct and precise location. The person that greets you, and by greet I mean a spectrum anywhere between a barely intelligible grunt to a very warm long-lost family-member greeting, might give you directions that are easily understandable or nonsense. The point is you don’t know what you’re in for. To our delight Dale Stokes Berry farm has a sign out front. We crossed the first hurdle, which is not encountering a man with a shotgun accusing us of trespassing.
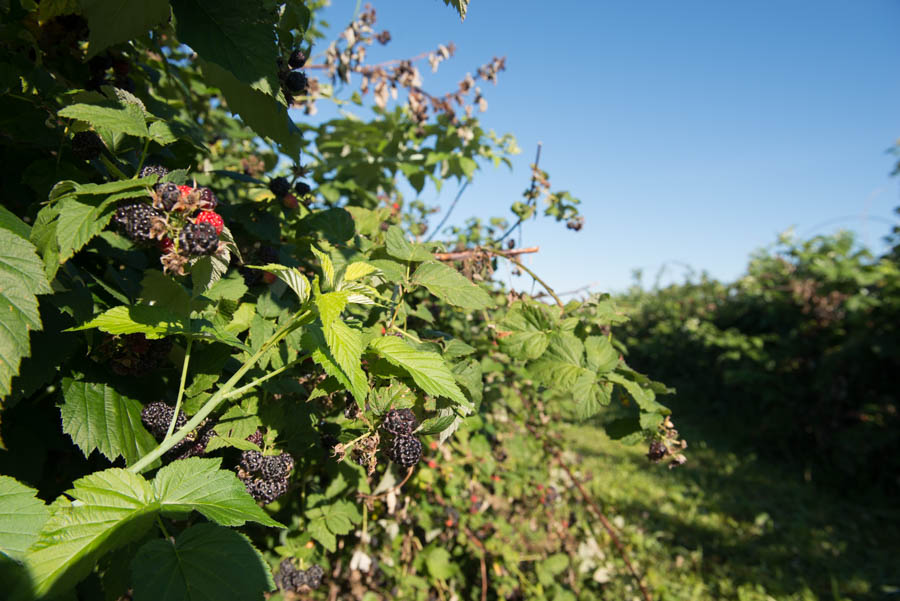
The gravel driveway seemed exceptionally long, but eventually we spied a small white hut. Investigation of the hut revealed a tween girl inside who confirmed that we were in the right place. She gave us pallets and instructed that we continue on the gravel path to porta-lets. You recall the point that I made about bizarre directions earlier? Yes. After turning a corner, porta-lets were in sight. I parked behind the porta-lets to avoid blocking the gravel path. A boy on a tractor confirmed we were in the right spot and instructed that we walk down a row until we see the girl. At this point, you might think that we are being lead to our deaths in sacrifice to the god of The Children of the Corn. But tucked up against a black raspberry bush was a young woman. She then instructed us to go further down another row to the stake with a plastic tie. Once there, we were to pick as we wished.
We arrived at the plastic tie. After walking down their rows of black raspberry bushes, it was clear that they had extremely well-kept fields. The raspberry bushes were excellently trimmed and pruned. The abundance of berries, seems to indicate that they are meticulous with their care. And the berries. The berries tasted incredible.
My grandma had wild black and red raspberry bushes in the back corner of her property. High summer was my favorite time to visit grandma. I would scamper off before dinner, spoiling it completely, by eating as many black and red raspberries that I could stuff in my face before I was called to dinner. I thought I was being sneaky about it, but I must have been covered with berry juice and scratches due to the abundance of thorns on the bushes. It was a mystery to my five-year-old self how the first words out of my mother’s mouth at seeing me were, “You were eating raspberries, huh?”
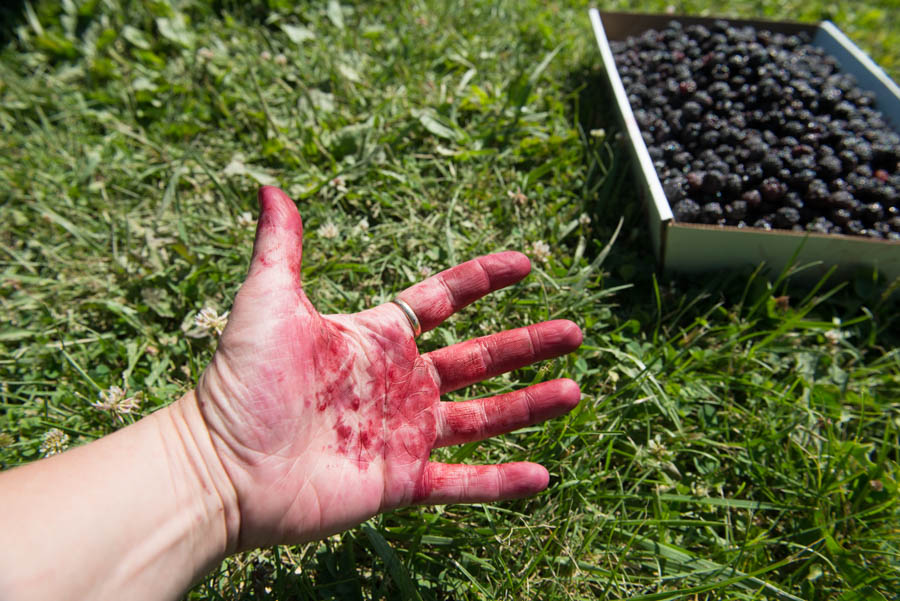
Standing there in the patch entering a zen place while picking and eating raspberries, it makes me feel close to that five-year-old. It bubbled up from my memory, that the best way to pick black raspberries was to have gentle fingers. This both protects from impaling a digit on a wayward thorn, and feeling the berries dropping away from the plant ensures that you are taking the ripe fruit. It was a clear, sunny day. I was lost in my physical experience of picking berries. It was wonderful.
We were done picking by 1030. This enabled us to have a solid brunch before we went on to can and clear the berries. Eating lunch. That’s one of the improvements we made over our blueberry marathon. Upon returning home, we set about making the Sure Jell recipe for black raspberry jam. We also set about making this recipe for sugar-free jam. The jams went off without a hitch. We canned them in a standard water bath and moved on to pie filling.
We followed the same clear jel process that we documented in our blueberry blog. The only difference in the recipe is that we put in a quarter teaspoon of Siagon cinnamon. Note that Siagon cinnamon is a little more savory tasting than the cinnamon you would typically find in a grocery store. The only difference in the process was that we didn’t blanch the fruit. That resulted in a slightly longer processing time.
Finally, I made the pie. I used the vegan pie crust recipe with my own home made vegan butter. These recipes can also be found in my blueberry blog. There are many things I could say about this pie. I will leave it at this; that pie was my “Mona Lisa” of pies. I pulled out one of our canned quarts, and made a black raspberry pie for my family reunion last week. My dad said that it was just as good as my grandma’s, which is basically the highest praise my father can give regarding pies, given that grandma made thousands of pies over her lifetime. Practice makes perfect. I can verify that this much is true about pies.
What did I learn? First, I will return to that farm to pick every year. Second, I will be canning more black raspberry pie filling next year. Third, black raspberries are the most magical fruit on the face of this earth.
Beautiful fruit from heaven.
These fields were gorgeous.
The berries were plentiful.
How would my mom have known that I was picking raspberries?
This was the plan. We would pick pick 10 quarts of blueberries. Then we would make two jams, 7 quarts of blueberry pie filling, one blueberry pie, and one apple-blueberry short cake. We had no idea that this was an overly ambitious plan. Here’s how it went down.
Do you know how long it takes two people to pick ten quarts of blueberries? We didn’t. I had some concept of the effort involved based on my past strawberry and raspberry picking experiences. We tend to forget negative bits of the past and retain the positive bits. This is how women agree to go through childbirth a second time. I figured it would take us a couple of hours. What I failed to figure was how fatiguing bending over and/or kneeling for 2 hours can be.
We picked at Hidden Valley Farm in Lebanon, OH. They opened at ten, which meant a pretty late start to our day. When we can, we tend to start cooking a little earlier than that. Plus, I know from my farm-raised father, that you really want to get your picking in before the heat of the day, which means being in the field at sunrise. Sweating your balls off really drains your energy, obviously not my father’s words.
After an hour in the car charting every back road in Southwestern Ohio and questioning the wisdom of Google Maps, we turned up at the farm at ten. When I told the old farmer that we were there to pick blueberries, he responded with, “Good. They aren’t going to pick themselves.” My dad’s family is thick with these types of characters. I don’t know if farming cultivates character, or if characters are drawn to farming.
A friendly woman approached and asked if we had picked blueberries before. I said no, but to satisfy my own anxiety at being perceived as a noob, I added that I’ve picked other fruits. She directed us to one of two areas with blueberry shrubs, and explained that we should look for berries that separate from the bush at a gentle twist. It’s still unclear if this woman was a helpful patron or an employee of the farm.
The twenty ounces of iced coffee that I expected to fuel my picking also set my back teeth afloat, so I inquired about a bathroom. I was cheerfully lead to an outhouse. Joy. I believe that this was my first outhouse experience. It could have been worse, but lets just say the lack of light in there was probably for the best. It did smell of a shit you might find in your closet days after the stench has alerted you to your cat’s passive aggressive punishment for vacationing.
I am listening to Andrew W. K. while writing these captions. This combo isn’t working. Pastoral pictures and frat rock, not a good combo. Anyway, this is what a blueberry bush looks like.
The shrubs appeared to be of varying maturity. It looked like they were correct in stating that they were at the beginning of their season. The shrubs had quite a few berries on them that were not yet ripe. Regardless, we did find plenty to pick.
Like strawberries, efficient blueberry picking is based on your eye catching color peeking out between leaves.
I’ve never seen a blueberry shrub before. They are squat little bushes.
They had two fields of bushes. That sentence made my inner twelve-year-old snicker.
Their second field was further from the entrance. We both reasoned that people probably didn’t venture back there as frequently, so the picking would be better. We decided to move to the second field. Logic and reason didn’t disappoint.
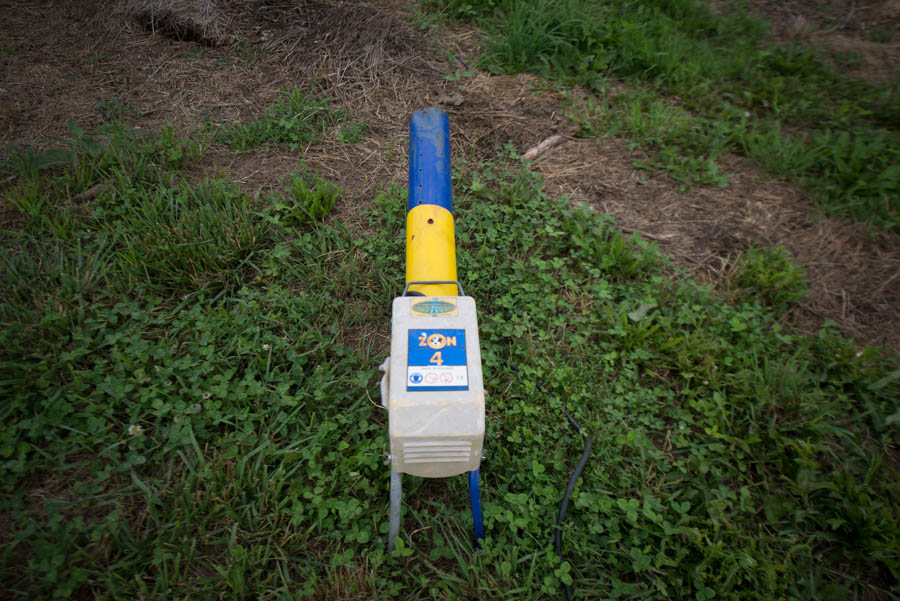
Their high-tech bird repellent.
We were wondering how they kept the birds off their berries. Birds find a way to get my cherry tomatoes off of my deck in the middle of downtown. This seemed a far easier meal. We were also wondering why we kept hearing something that sounded a little like gun fire. I had actually assumed someone was getting in target practice within earshot. Turns out those ideas aren’t as unrelated as you might think.
As we approached the second field, there was muffled screaming, “Fire in the hole”! Now, reasonable people would have reconsidered approaching, but we aren’t reasonable. We found an air gun set-up at the edge of the field. It was rigged to a container of propane, and was set-up to go off at intervals. In the spirit of Scooby Doo, bird-eating-berries mystery solved.
Their low-tech bird repellent.
This is what almost eight quarts of blueberries looks like.
With the picking adventure in the bag, we started cooking around one in the afternoon. We started on two varieties of blueberry jam. We made one batch of standard jam, and we made one batch of this spiced blueberry jam. Aside from the fact that we needed to gather some last minute ingredients (thanks Jenn and Carly), making the jams went as planned.
Spiced blueberry jam prior to simmering.
Spiced blueberry jam.
Panna Cotta topped with fresh blueberry jam.
My canning partner Ali, who is almost always the we that I am referring to when cooking, brought over panna cotta. Naturally, we put fresh preserves on it. The standard blueberry jam passed this test with flying colors. The panna cotta was delicious, and really would have been wonderful pared with any fruit topping.
Jams just before sealing.
The spiced jam is interesting. The star anise gives the impression of excessive sweetness, but the cider vinegar counterbalances it. I wasn’t sure how I felt about it when tasting it on its own. I later spooned a bit of it on the panna cotta and enjoyed it. My partner said that she couldn’t tell the difference between the regular and spiced jams, so it’s safe to say the difference is subtle.
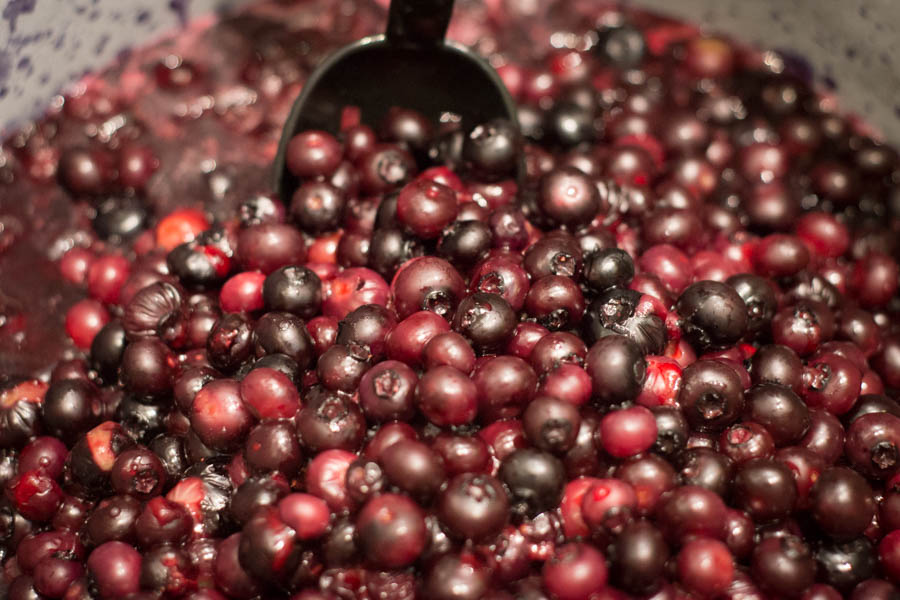
Blanched berries. These got combined with the Clear Jel and sugar mixture, that would also double as cement in a pinch.
This was our first time canning pie filling. It did not exactly go off without a hitch. According to my not-so-exhausted research, Clear Jel is the only product approved for home canning. This product was a real pain to get hold of. Here’s the recipe we used. I’m not going to delve into the challenge that was Clear Jel. I am just going to say the things that I learned. First, when the instructions say don’t overcook, what they mean is don’t heat it up too fast. If you should, perhaps, misinterpret this direction and heat it up too fast, just know that the terrifying inconsistent gelatinous goo that results can me beat out with a wisk if you remove the pot from heat. Second, the sugar Clear Jel combo will form something like cement if you fail to clean your pot almost immediately after use. Third, the instructions are poorly worded. If you choose to work with this product, I can only say, my the odds be ever in your favor.
Pie filling. Let’s not think about how many dollars of blueberries are in that jar.
By the time we finished the jams and navigated the Clear Jel fiasco, we were beat. At six we slumped down at the table, and dolefully looked at each other. The glance that we shared said it all. What were we thinking?
After a few moments of commiserating that our work was not yet done, we started on the pie and the shortcake. I had made the pie crust some days earlier, and it was just a matter of rolling it out and assembling the pie with the filling that we had finished.
I followed this vegan pie crust recipe, and used my own homemade vegan butter. I know what you are thinking, meat eater. You are thinking that this must taste like crap. I am also a meat eater, and frankly I thought the same. The vegan butter was quite good. It was better than any margarine that I’ve had by a long shot. In a blind taste test, I bet I would struggle to identify butter from this vegan butter.
The pie rolled out wonderfully. I was suspicious, as in my experience, the flakiness of a pie crust has an inverse relationship with the ease with which it rolls out. Pie crusts that roll well, are pie crusts that have too much water. But the crust turned out really great. It was the right balance of flaky, crisp, and sturdy. This crust was good enough that I am making it my default recipe.
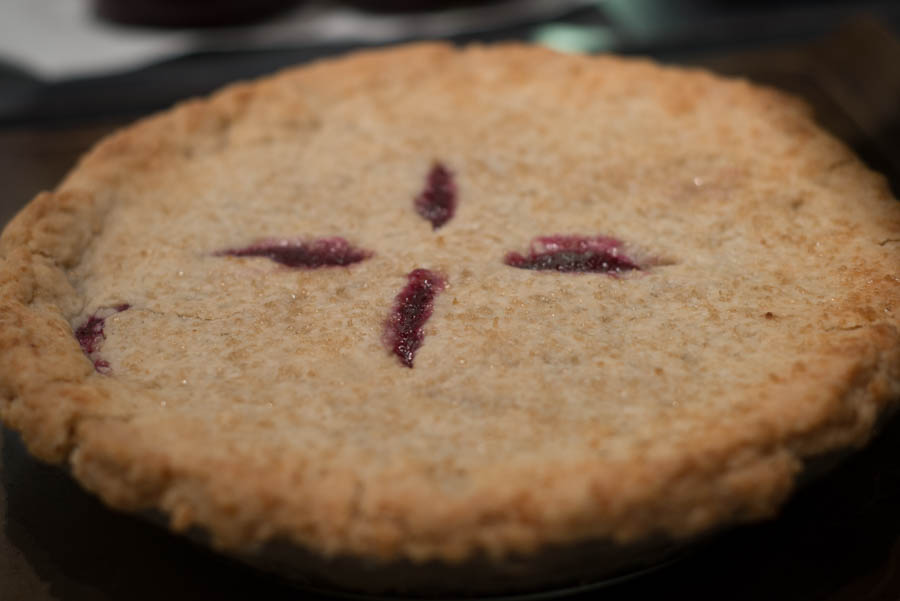
Pie right out of the oven.
That’s a fine-looking slice of pie.
That brings us to the shortcake. Did you look at the recipe? Stupid metric system. Or perhaps, stupid America for not adopting the metric system like the rest of the world. In addition, this thing looked like a ghastly mess when we put it in the oven. The dough was difficult to work with. We were shocked to find that it came out of the oven looking exactly like the pictures. I’m convinced that elves replaced that hot mess we put in the oven with a fully prepared shortcake.
The shortcake turned out pretty well. It was a bit more tart that I would have liked, but the cake part was pleasant. Personally, I would add a bit of vanilla to the cake, as it had more of a pound cake texture than biscuit texture. In America, pound cake means lightly sweetened biscuit; I don’t know how you Brits do it.
What are my lessons in summary? Vegan pie crust is great. Clear Jel is a filthy whore. Brits don’t know what short cake is. Blueberry jam is delicious. The end.
Strawberries are the bellwether that signals mad canning will commence. We have blueberries, peaches, tomatoes, and black raspberries come into season in quick succession. The reality is I will be canning jams and making pies constantly until the late fall after apples and pumpkins go out of season.
I didn’t used to have this relationship to produce. Because strawberries are only available for three weeks of the year, it makes procuring a bit of an ordeal even if you don’t pick your own. They are loved and cut and washed. They are crushed and cooked with sugar and pectin. The jam takes on a vibrant ruby color unique to fresh strawberries cooking into jam. They are sliced and placed in a crisp light pie crust. All this preparation is an investment, for which the pay off is the most delicious, fleeting strawberry pie. And a year of delicious jam.
We got our berries from Barrett’s Strawberry Farm, 11434 Fairfield Road, Leesburg 937-780-4961. I just came back from Europe and was concerned we would miss the season. Typically, strawberries come into season in May in this area. They wrap up in early June. But like the rhubarb, the berries were late this year. Most farms didn’t start their season until early June. Given that it’s early in the season, we had some difficulty getting berries. Barrett’s was about a 90 minute drive from Cincinnati, but the price of their berries was quite good, I got 6 quarts for a little over 22 bucks. Their berries looked great and tasted excellent.
Fresh from the field
We made a double batch of jam according to the instructions on the Sure Jell package. I also made strawberry pie according to this recipe. The jam and the pie turned out wonderfully. I just located this recipe for pepper balsamic strawberry jam and will have a blog in the near future about that.
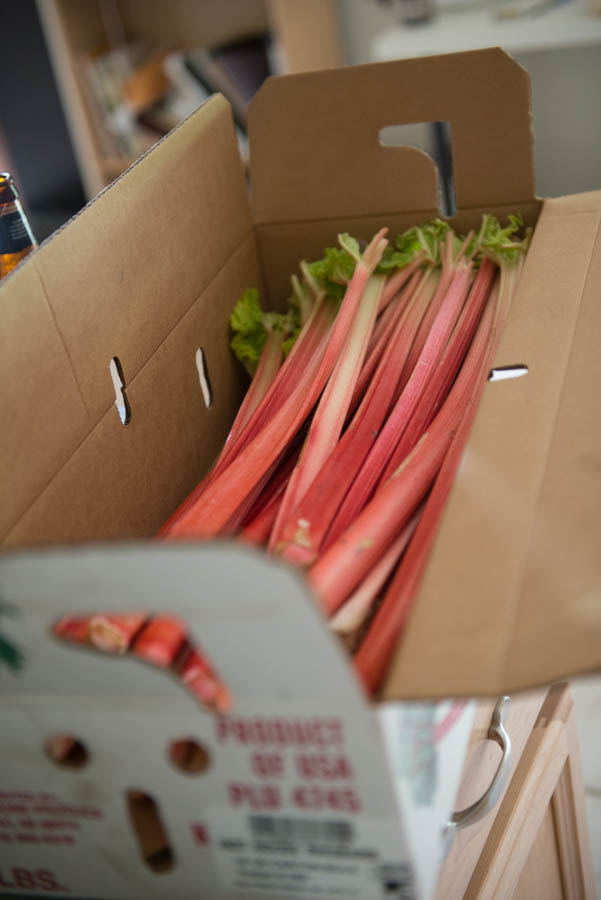
We started out with ten pounds of rhubarb. We probably had about three pounds left after making a double batch of jam and single batches of everything else listed above.
Rhubarb. That’s what it looks like.
I made the muffins a few days before everything else. Putting them together was pretty easy. Since I cook and bake quite a bit, I had nearly all the ingredients in my kitchen. I had to make a trip to pick-up sour cream and a fresh lemon for the zest. These muffins were spectacular. The streusel with fresh lemon zest and almond extract was outstanding. The muffins were tender and only slightly sweet, and the bits of rhubarb added just a bit of zip to each bite.
Rhubarb jam prior to cooking
We put the jam in the slow cooker to leave more space around the stove top. After some hours on high with no signs of boiling, we transferred it to the stove. I’m not sure why the slow cooker wasn’t able to bring it to a simmer. Perhaps all the fiber and pectin in the rhubarb? We don’t know. Once the jam came to boiling, it thickened right up. We sanitized lids and jars, and filled them with the jam. Then we canned them in a traditional water bath. We finished with the jam after a long day of cooking. I was too exhausted to taste it before we canned it. I will come back and comment on how well it turned out after I open the first jar.
Vegan pie, pre-baking
I mastered the difficult art of making pie crust. Making a vegan crust was a new challenge for me. I had two concerns about the vegan pie crust recipe that I linked to above. There are two things that I know about consistently making excellent pie crust. Rule number 1: if the dough is easy to roll out you have without question added way too much water. Rule number 2: the dough needs to be as cold as possible all the time. The vegan recipe above breaks rule number one egregiously. I know the point of adding the vodka is so that it evaporates and leaves you with less moisture in the finished crust than only water would. But my no-fail non-vegan recipe only calls for 3 tbs of water against the 1/4 cup of water in the recipe above. And then you add an additional 3 tbs of vodka. I used half as much vodka and water in my dough than what the recipe called for.
Second issue I had with the recipe was the fat to flour ratio. As compared to my usual recipe, there was about 1/2 a cup more fat. I decided to follow the recipe here. I was thinking that perhaps the vegan butter had more water in it than butter, and hence required a higher fat to flour ratio. You will have to keep reading to find out how it turned out.
Here’s the rhubarb that ended up in the rhubarb upside down cake, while it was being caramelized.
We modified the rhubarb upside down cake in the following ways to make it vegan. Where the recipe called for butter, we used vegan butter. Where the recipe called for milk, we used soy milk. Where the recipe called for eggs, we used flax eggs. You can read about flax eggs here.
Tempeh and Tofu after the marinade.
For the reubens, we used marinated tempeh and tofu. We just sliced both of them up and let them marinade. After they soaked up some flavor, they went into the oven on a baking sheet to get a little texture to them. I also made a vegan 1000 island dressing for the reubens. I used the silken tofu recipe here. I whipped this up in the food processor. The resulting mayo was pretty good. It was a bit more runny than regular mayo, and I could taste the missing egg yolk. But I don’t think anyone would notice the difference once spread on a sandwich. I added the relish and ketchup to taste and didn’t follow any recipe.
The poorly-named rhubarb upside down cake. I should have been something like rhubarb upside down scone or some such.
The rhubarb upside down cake was not sweet. It was more like a biscuit with caramelized rhubarb on top. In fact, it would almost be a savory dish. I was expecting something sweet so I was a little put off with it at first bite. Once I realigned my expectations, I thought we made a damn good vegan biscuit. Would I make this again? Probably not. It wasn’t bad, but plain old biscuits would have suited me just as well and are less work. The flax eggs made the biscuit taste like it was made with some whole wheat flour. I don’t know that flax eggs would work in most other sweet pastry settings, but it was excellent for this savory biscuit.
The braised rhubarb was weird. It was extremely tart. Tart, I could have lived with, but the texture of the rhubarb was not to my liking. Cooked celery keeps it’s body, unless you cook it for ages. The rhubarb managed to be completely limp and stringy all at the same time. I don’t know how else to put this, but the texture just wasn’t for me. The flavor of the spices was nice. The tartness I could live with. Limp and stringy, I cannot.
The two biggest successes were with the reubens and the vegan rhubarb pie. I’ve learned that for me, the critical reuben components are sour kraut, 1000 dressing, and excellent bread. The other ingredients don’t make or break the sandwich. The tempeh and tofu were good, but they didn’t stand out. The vegan 1000 island dressing was excellent. We ran out of the reubens. I now know that my craving for reubens can be met without out eating any animal products.
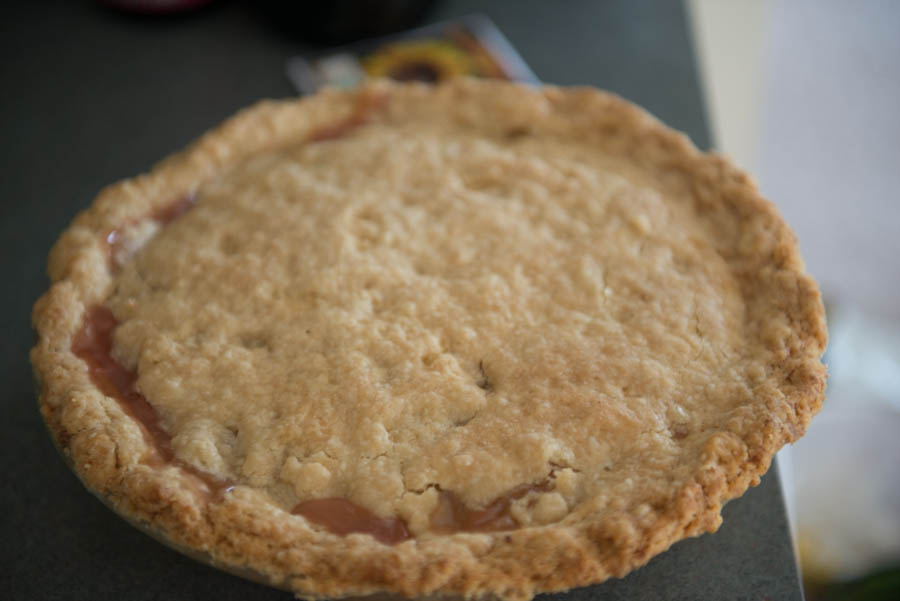
Vegan rhubarb pie.
The pie was spectacular. The crust turned out wonderfully. It was flaky and yet held it’s shape when sliced. We were only left with three pieces for Ali and I to share. I thought I was going to have to fight Jenn for the piece and a half that I brought home.
Here’s what I learned about vegan cooking and baking. It’s not that hard. In fact, I think it would be a lot easier to cook and bake vegan at home that it would be to eat out. I liked it so much that I might start making my own vegan butter and working that in to my cooking from this point forward. This will be the first of many adventures.
No one grows rhubarb. I didn’t know this before emailing, calling, and visiting farmers. Apparently, it fell out of fashion some years ago. With a drive to eat more local produce, demand is growing, but supply is behind the curve. The plants have to mature for two years before they have a decent yield. I heard from numerous farmers that they will have more next year or the year after.
I’ve been stalking Findlay Market, Northside Farmers Market, and Lunken Farmers Market. I’ve called and emailed numerous farmers. I was warming to the idea of just getting non-local rhubarb from Kroger. Madison’s at Findlay Market had some, but not only was it greenhouse grown and shipped from Washington state. I objected less to those details than I did to the four dollars a pound price.
Just as I was giving up on rhubarb jam, I saw that Madison’s had local rhubarb. Not only that, but the price was three dollars a pound. That’s a bit more expensive than Kroger, but I am willing to pay a little extra for local produce and to support local business. (Kroger is sort of a local business, given that it’s headquarters is here. But I digress.) Unfortunately, when I went to pick-up the rhubarb, the clerk at Madison’s said that their supplier was out and couldn’t fill the order.
I was finally able to get my Rhubarb from Kroger. I had to special order a ten pound box from the produce department. Jenn and I dropped by Findlay after Five event after picking-up the rhubarb from Kroger. I ran into the Madison’s clerk, and he told me that they had my rhubarb. Their suppliers are Mennonites and don’t have phones. So, when the rhubarb didn’t arrive the folks at Madison’s could only assume that they didn’t have any. Unfortunately, the rhubarb turned up a day later. I didn’t leave my contact information at Madison’s so they had no way of letting me know. Rats!
The point is that Madison’s now has local rhubarb. The second point is that I will leave my contact information while hunting and gathering from this point forward. The third point is that I will publish our rhubarb adventures in a day or two.
So much cooking happened on Sunday. Here’s a list of what we made.
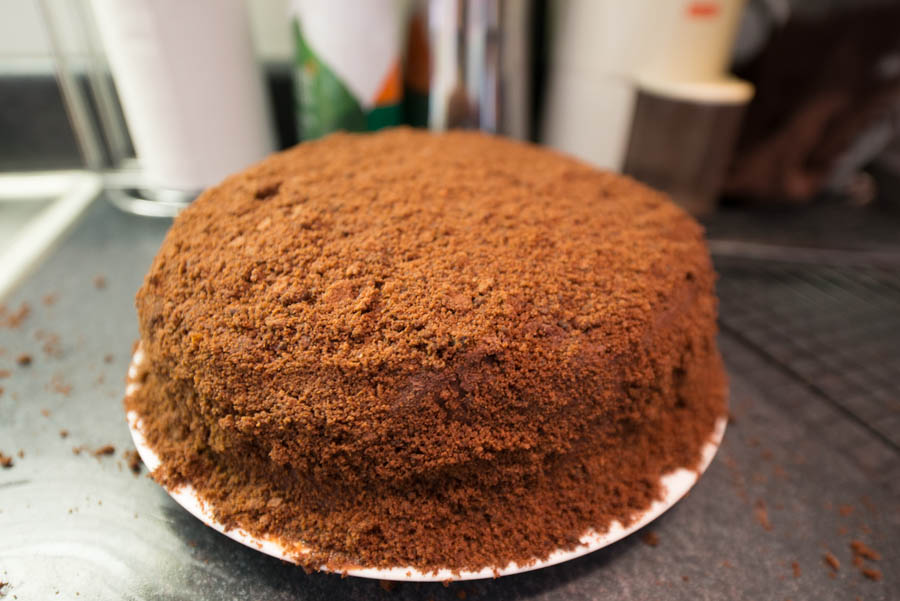
Erbinger’s Blackout Cake
Founder’s Breakfast Stout spicy mustard
Alton Brown’s Best Mustard
Vegetable stock
Canned chai spice pears and apples
Canning season is upon us. This means that many of my free weekend days will be devoted to either picking produce or canning it. In preparation for that, we decided to make a double-batch of broth, and a double-batch of mustard, as we will have no time to make either of these things until late in the fall.
The Cake
As I was planning a whole day in the kitchen, I saw this recipe. I don’t really like cake, but my curiosity was too much to resist. After reviewing the ingredients list, I realized that I had all of them except the cocoa and chocolate. The cocoa and chocolate set me back thirty bucks. That’s right three zero. When I consider what it must have cost to make this in the late 1800’s my brain explodes.
While the blogger in the NPR article complains more than I deem necessary–seriously all cake from scratch is a pain in the ass–I did spend a solid three hours preparing this cake. Given that I am not a cake expert, I was a bit concerned with getting the cakes out of the pan, and subsequently slicing them in half and constructing the layers. To my surprise, that was a cakewalk. Oh puns.
Here’s one of the cake’s just out of the pan. They came out of the pans with no problem.
This is the melted chocolate that was used in the icing.
The cake turned out well. The only thing that might have gone a bit better was how the filling set-up. I think I didn’t allow the filling to boil long enough to make it set-up properly. It was just a bit runny when I spooned it on the cake layers. I invited friends to drop by and sample the cake through out the day. They all seemed pleased with it. I liked the cake despite my general dislike for cake. I thought it would be considerably richer than it was, given the ingredients list. But the cake was a really nice balance of sweet and rich. It didn’t overwhelm, and make me feel a little disgusted after bite three, which is my typical cake experience. I will gladly make this again.
Here’s the cake before we cut it.
Here’s the cake after we cut it. One thing that NPR got completely right is that this cake has almost no self-life. The icing gets really dry if refrigerated. The pudding gets runny if left out.
The Mustards
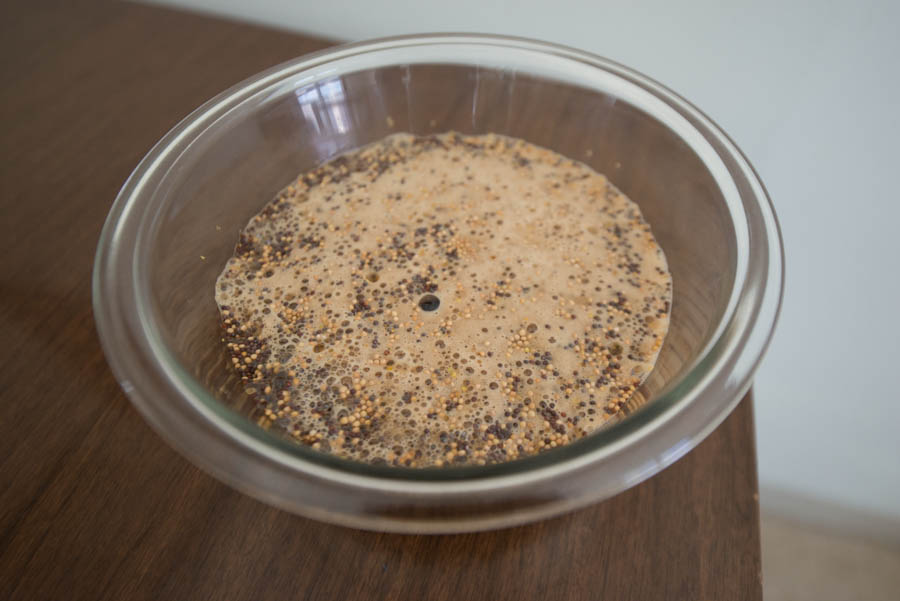
Homemade mustard is easy to make, keeps well, and tastes light years better than store bought. If you haven’t tried to make mustard, for god’s sake do it. You have zero excuses for not trying one of these recipes. This is a nice standard yellow mustard. If you have an immersion blender, you can make this as smooth or textured as you wish. It has depth of flavor that I didn’t know was possible in mustard. I ate all of our first batch on black bean burgers in about a month. I can’t wait to try it on soy dogs this summer.
And given that I am a beer nut, I wanted to try out a beer mustard. I happened to have a couple of bottles of Founder’s Breakfast Stout on hand. Everything with this recipe worked well, except the resulting mustard was a little too thick for my personal preference. No worries, just add more beer. The mustard turned out so great that I have been searching for things to put it on. I want to buy soft pretzels to dip in this mustard. I want to smuggle my own mustard in to eateries so I don’t have to suffer through French’s.
Here’s the yellow mustard in the little three oz jars. They are adorable. We didn’t can this because the amount is insignificant enough to store in the refrigerator.
Here’s the mustard seeds and the Founder’s Breakfast Stout working their magic.
The yellow mustard just after blending it.
The Stock
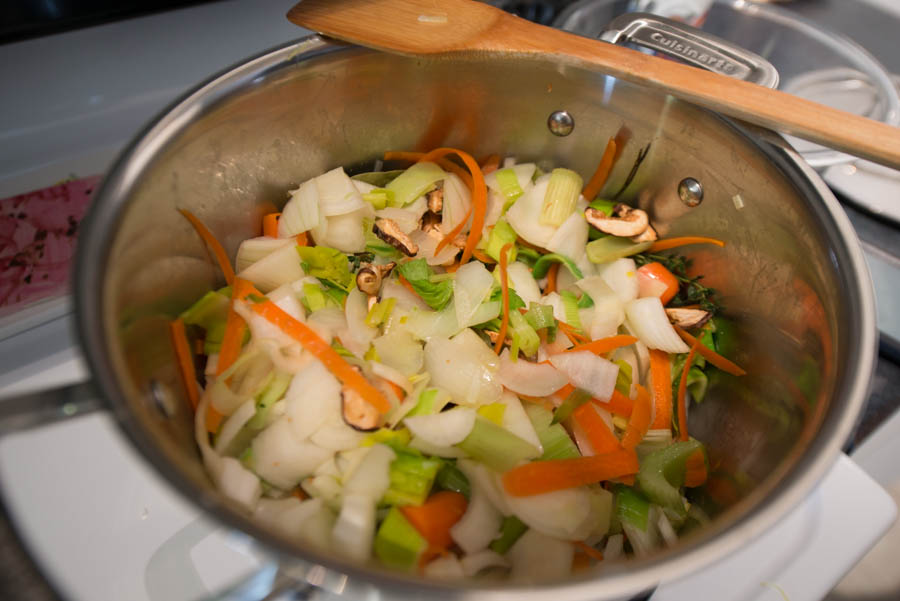
This is round three of making this stock. We made a double batch because we ran through the results of our last canning session quite quickly. We’ve used this same recipe as the base on all three efforts. Here’s my last blog on the second go at this. After the first effort, I added a step of browning the veggies and forming a nice fond on the bottom of the pot prior to adding the water and the herbs. This added a nice rich flavor to the stock. I suggest adding this step if you have a good stainless steel dutch oven.
On this attempt, we threw in some dried shiitake mushrooms. The mushrooms add a nice solid earthiness. We threw the resulting broth in the pressure canner. All the cans came out as expected. All the jars let out their chorus of pops minutes after being removed from the canner. I will use this both to make cream of mushroom soup next week. I have a special place in my heart for that not so great Campbell’s variety. I am excited to see what cream of mushroom soup is like when made with fresh ingredients.
Here’s the veggies that we cooked down into stock. The last time we made this stock, we didn’t add the mushrooms. Those really added a lot of flavor.
Here’s the veggie broth fresh out of the pressure canner.
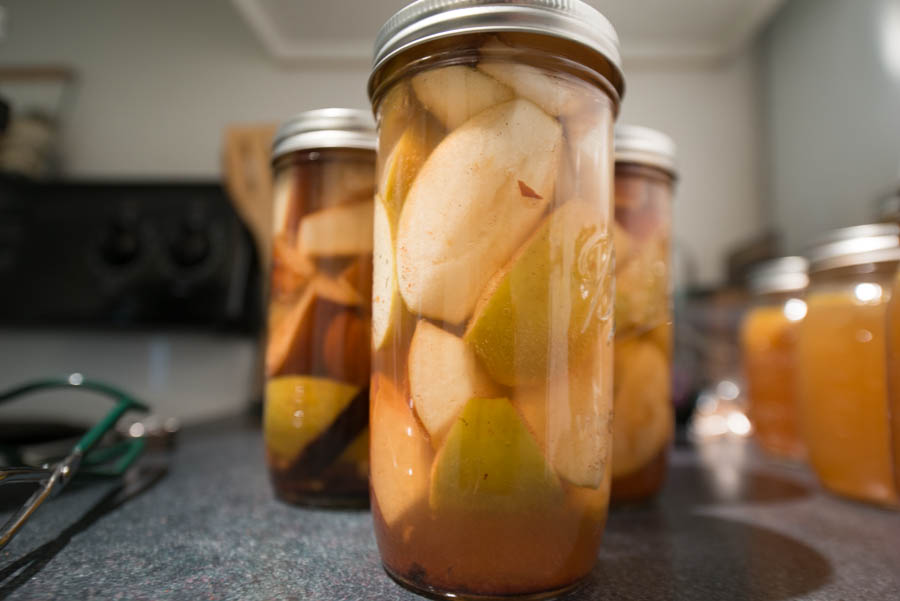
The Apples and Pears If you’ve been reading the blog, you know that we canned spiced peaches last summer. You can read about it here. In hindsight, we did some things well but others could use improvement. Adding teas to a few of the jars of peaches, was a stellar idea. Throwing the spices directly into the jars had some unintended consequences, that we would like to avoid. Last year, we threw about a quarter of a vanilla bean, an inch long cinnamon stick, five pepper corns, two cardamom pods, and one star anise in the jars. We pack a few jars with just cinnamon or just vanilla. Here’s what we learned.
Star anise or cardamom in those quantities would completely over-power the vanilla and cinnamon
The cinnamon stick would become a bit astringent, which of course, was only noticeable in the cinnamon only jars as the flavor was over-powered in the mixed spice jars
While we put roughly the same amount of spice in each jar, star anise and cardamom are natural things, so the resulting flavor varied significantly from jar to jar of the mixed spice jars
If the goal was to produce the over-all impression of Chai spices we forgot ginger
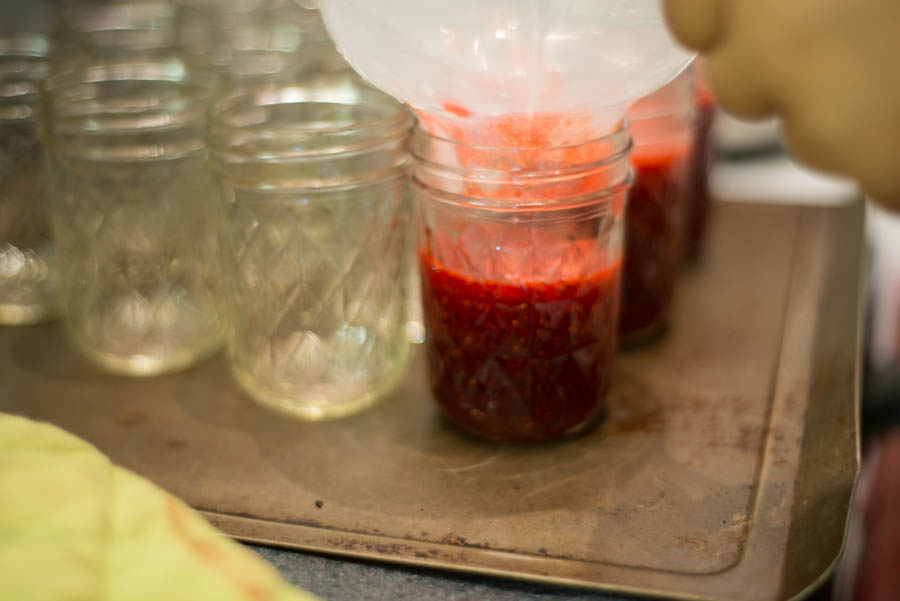
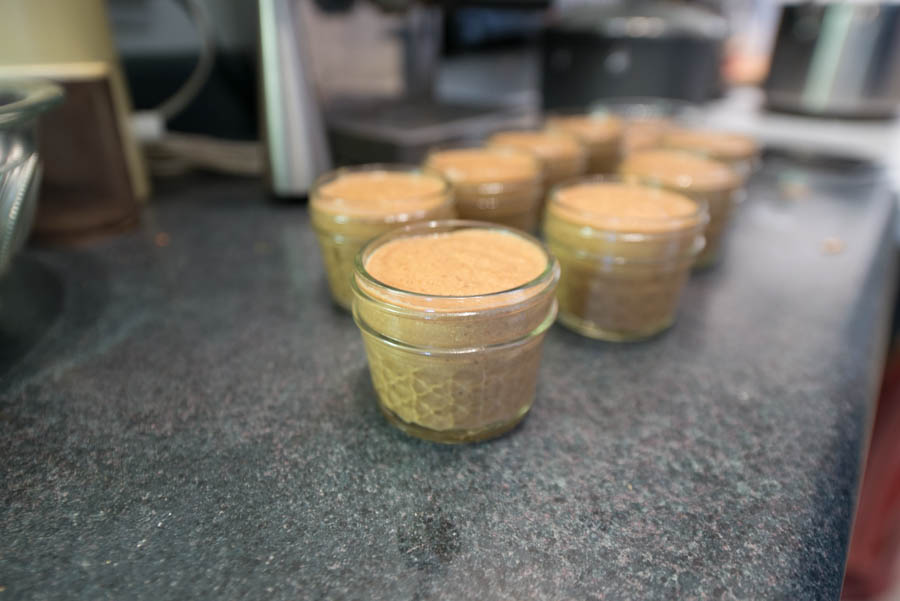
Given that we want to pack peaches again, we wanted to try and rectify the issues that I’ve listed above. We decided to make a spiced simple syrup. Approaching the spices in this way should enable us to have consistent flavor from jar to jar. It should also allow us to balance the spices. We decided to get some apples and pears to can as a test run. We produced about 6 pint and a half jars. We made a simple syrup that ended up being one part sugar to three parts water. The spices that went in the syrup was as follows.
Half a star anise
Three cardamom pods (which we decided could be taken back to two)
A whole vanilla bean
1 teaspoon of ground Saigon cinnamon
one inch of sliced ginger root
Being able to adjust the flavors in the syrup is a huge improvement over our past approach to canning spiced peaches. We will be spicing the syrup when we can peaches this summer. I tried the apples and pears the day after we canned. They have a very nice balance of spice, and the sweetness is perfect. The taste of the apples and pears come through and the spices are a subtle addition. BOOM! Problem solved.
Ok, summer. We are ready for you.
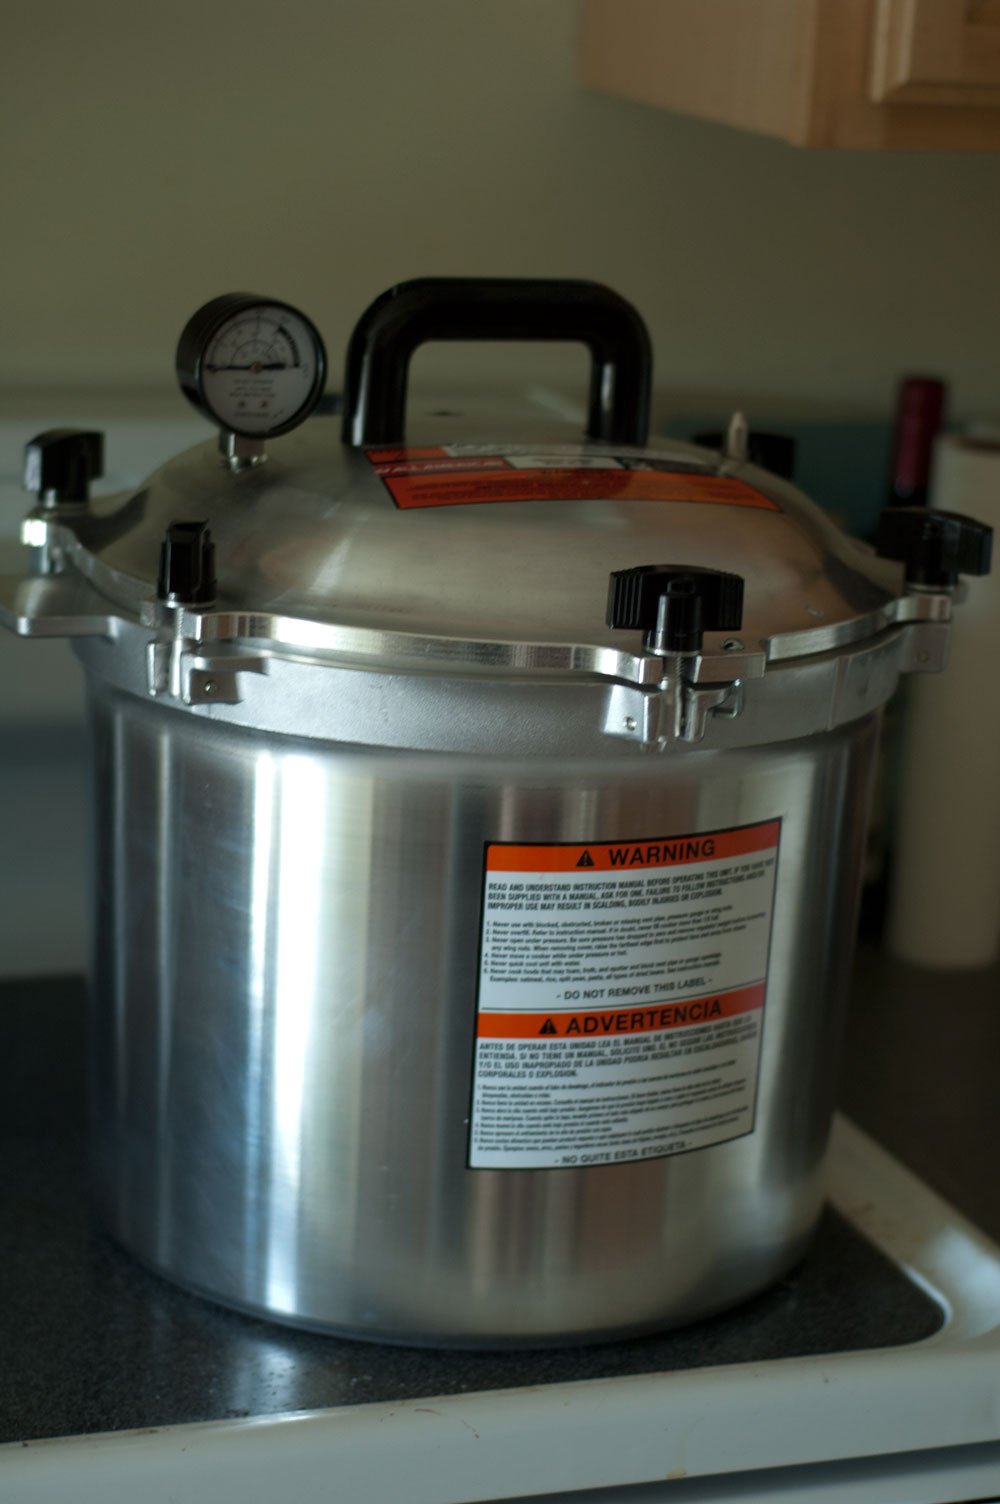
Here’s the pressure canner with the pears and apples in it. We just sealed those with a water bath as opposed to pressure, like was necessary with the broth.
Here’s our spiced apples and pears. The pears ended up with a perfect texture. The apples ended up a little soft. The spice levels were outstanding.
As mentioned in a previous blog, it’s canning off season, and the polar vortext has left me, a skier and winter lover, stuck inside. What do I do with time on my hands? I cook stuff.
I’ve been considering making my own veggie stock. I use it in several recipes, and I’ve noticed that the most obvious flavor that most veggie stocks impart is salt. They are salty. I don’t taste much else there.
I’ve wondered how much my recipes would improve if I had some kick-ass veggie broth instead of mega-salty water. I hunted broth recipes. I’ve not made this before, so I didn’t know what I was looking for. I was armed with one bit of knowledge. The holy trinity of veggie soup flavor is garlic, celery and onion.
Garic? Check. Onion? Check. Celery? Check. Plus, thyme and coriander are wonderful additions. Bonus points for most of the ingredients already present in my fridge.
My first time making this I salted once the broth was finished. I added about 3 teaspoons. That was salty enought to accentuate the flavors, but not so much that it over powered the veggies. Otherwise I didn’t wander from the recipe. The broth didn’t have much flavor. But then, I don’t imagine broths are supposed to have much flavor. Isn’t that why you add stuff to them for soups and use them as a base for other stuff?
The real test of the broth would come the first time I used in a recipe. My first use cases were in a recipe for peanut thai noodles and then pineapple curry. Both were super, but the recipes only called for a half a cup of broth. Given this insignificant amount as compared to other ingredients, I didn’t notice an earth shattering difference. But when I used the broth in pumpkin curry soup, I noticed. It just made the soup have a little more depth. That soup is already spectacular; the homemade broth bumped it up.
My first run out with the broth was successful enough that I wanted more. On my second batch, I browned the veggies and got a nice fond on the bottom of my pot before deglazing with the 3 quarts of water. This minor step both brought a nice color to the broth and also imparted a great flavor. I will continue with this modification.
When I make my third batch of broth I will make another addition. Mushrooms. I think the earthy addition will round out the flavor and make this broth a go to for cream of mushroom soup. Yum. I can’t wait to try this.
Broth requires pressure canning. I didn’t pressure can my first batch of broth. I poured some of it into ice cube trays and the rest went into 1.5 pint jars. Broth ice cubes were a stroke of genius on my part. I have a number of recipes that call for a small amount of broth (less than a cup). My 1.5 pint jars carry too much liquid to thaw a whole jar and only use a half a cup.
We pressure canned the second batch. It was as much an experiement as it was a necessity. It simply isn’t that difficult to store 3 quarts of broth in the freezer, unless you are some sort of food hoarder. (I just thought of what it must smell like in the home of a food hoarder and grossed myself out.) The pressure canning went fine. I don’t know that I will find time to replenish my veggie stock once we hit canning season, but I am sure I will miss it when I return to using those little cubes of salt that pass for bullion.